Firebox Content Inspection
The following guide describes the system in place that allows Heard County School District to allow / deny HTTP(S) content coming from the internet.
Overview
Firebox firewalls have a feature called Web Blocker which utilizes HTTPS Content Inspection. WebBlocker intercepts incoming traffic from the internet and analyzes it against a customizable table of rules to determine if it contains materials that violate the rules of the organization. Aside from the initial configuration, WebBlocker creates a problematic situation for any websites being served across SSL. It has to decrypt the HTTPS packets to analyze them for inappropriate content. This means that the firewall has to re-encrypt the pages with its own self-signed SSL certificate before passing it to the user, but the user doesn't automatically trust this certificate, and the average user does not know how to navigate this issue.
There are two possible solutions: you can distribute the self-signed certificate to each machine directly or replace the certificate with one signed by a third party certificate authority (CA).
Using a third party certificate authority (CA) is the best and most highly recommended option as, if you have to replace the firewall, it's going to have a completely different self-signed certificate and the clients will no longer trust it. This problem is irrelevant in the case of a third party CA as you only have to reissue / reinstall the certificate to the firewall, and it's implicitly trusted by the clients already.
Certificate Authority
Setting up an enterprise CA can be a daunting task depending on your usecase. What we're aiming for here is to create a new PKI, where the root certificate is distributed to all client machines, and then the root certificate is used to sign a re-signing certificate (similar to an intermediary leaf in other, larger PKIs) that gets used to sign the content from inspected websites.
One system that fits this perfectly is the Windows Active Directory Certificate Services role.
Set up a machine in your AD domain and give it a static IP and hostname. Ensure that the hostname is exactly what you want it to be. Certificate Services breaks completely if you ever change it.
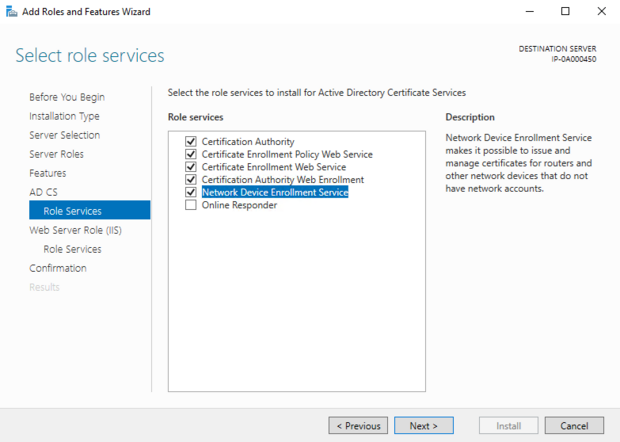
When installing the role, make sure the following are all set:
When configuring the roles after the install, ensure that the options "Root CA" and "Enterprise CA" are selected. Root CA sets it to create a new root certificate which will be the start of our PKI. Enterprise distributes the root CA to all machines in the domain.
Also select the rest of the roles that were installed above when configuring. You don't have to do anything special to them, this just enables them.
It's a good idea to now run gpupdate /force and then reboot the machine.
Now, after you do this, open a web browser and navigate to http://[fqdn of the machine including domain]/certsrv. A login prompt at the top of your screen will appear. Log in with a domain administrator account. Make sure you include the domain prefix if you're using "Administrator" or else it will log in using the local admin privileges of that machine, which do NOT include "network admin" privileges.
Generate the CSR
Now that we have our PKI infrastructure in place, we need to generate the signing certificate in the Fireware Web UI.
From the Fireware Web UI, go to System > Certificates and select Create CSR.
Press Next.
From the list of options that appears, select Proxy Authority (not Proxy Server).
Fill out the following fields with either the defaults listed or with the information for your domain depending on the form.
At the end, you will have a CSR. Copy this and go to the url referenced previously, http://[fqdn of the machine including domain]/certsrv, and log in.
Select Request a certificate.
Choose advanced certificate request.
Paste your CSR into the box above and from the dropdown select Subordinate Certificate Authority.
From the results page, download the file as base 64.
Now, we also need to export the root CA and import it.
Import Certificates
From certsrv, select Download a CA certificate, certificate chain, or CRL.
Select Download CA Certificate and download the file.
From the Fireware Web UI Certificate page we previously navigated to, select Import or Import Certificate. Select General Use. Import the root certificate we just downloaded. Repeat this procedure for the signing certificate, but select Proxy Authority. This will replace the existing Proxy Authority certificate and webblocker will now use your new one.
You may now test this by attempting to access invalid content.
Troubleshooting Firefox
There's a very good chance that you will now discover that you still cannot view blocked content without being prompted with the bad certificate screen if you use Firefox on your client machine. This is because Firefox does not implicitly trust root enterprise certificates.
To test if your certificate is working at all, in the Firefox URL bar type about:config and press continue past the warning that appears. Search for "enterprise" and enable the enterprise roots rule, then restart Firefox and attempt again. It should now work, but you probably do not want to do this to every single computer running Firefox.
This guide from spiceworks will allow you to fix this through GPO!
